
Deploy WordPress on App Engine Flexible Environment

Bài viết dưới đây được viết bằng 2 ngôn ngữ tiếng anh và tiếng việt để nhiều người có thể tiện theo dõi
Bài viết được viết dựa trên bài lab của google cloud: Link
Step 1: Enable the App Engine Admin API
Bước này có mục địch mở các API để App engine kết nối được tới database cloud SQL (xem thêm các loại lưu trữ trên google cloud)
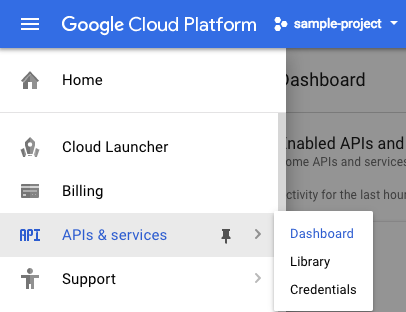
Let's get started. First, click on the menu icon in the top left of the screen:

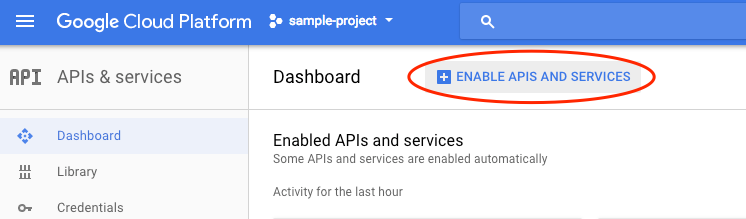
Select APIs & services from the drop down and click on Dashboard.
Click on Enable APIs and services.
Then, search for "App Engine" in the search box.
Click on App Engine Admin API, then click Enable (
note: this API may already be enabled.)Step 2: Set up your project
Now you will make sure the Cloud SQL API is ready to be used and once you do, you'll create:
- A Cloud SQL instance
- A Cloud Storage bucket
- Configure these services for your WordPress blog
Enable Cloud SQL API
To enable the Cloud SQL API, run the following commands:
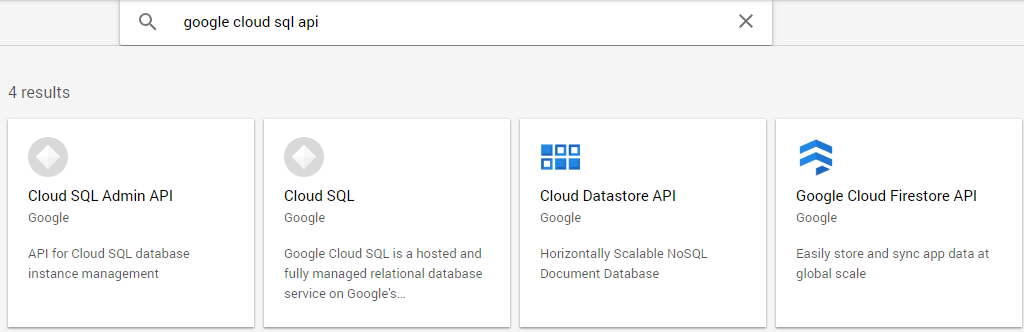
- Click Navigation menu > APIs & Services > Library.
- Type Google Cloud SQL API in the search box.
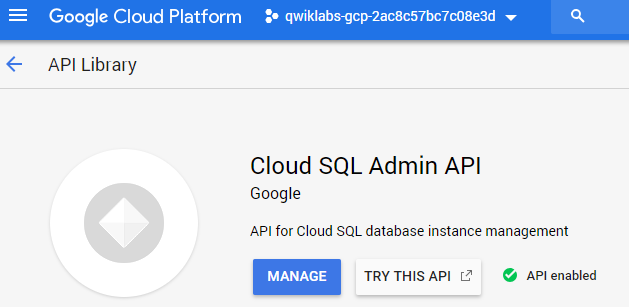
- Click on Cloud SQL Admin API, and then click Enable (
note: this API may already be enabled.)
Once you see the following, you'll be ready to create your Cloud SQL instance.
Create a Cloud SQL instance (tạo cơ sở dữ liệu để lưu trữ)
To get your instance set up properly, run the following steps:
- Click Navigation menu > SQL.
- Click Create instance.
- Select MySQL, and then click Next.
- Click Choose Second Generation.
- If prompted, choose MySQL Development.
- Type wp in the in the Instance ID field and enter password for the Root password.
- Click Create at the bottom of the screen. It will take a few minutes for the instance to show up.
Create a User and a Database
Let's go ahead and setup a User and Database in our MySQL instance:
- Click the wp instance you just created.
- Click Users.
- Click Create user account.
- Type wp in the Username field and enter password in the Password field.
- Click Create.
- Click Databases.
- Click Create database button.
- Type wp in the Database name field and click Create.
Click Check my progress below to check your lab progress.
-----------------------------------------------------------------------------------------------------------------
Create a Cloud Storage Bucket and set the default permission (chỉnh sửa quyền để wordpress có thể ghi dữ liệu vào trong bucket)
Now let's create a Cloud Storage bucket:
- Click Navigation menu > Storage.
- Click Create Bucket.
- Type the bucket name (for example,
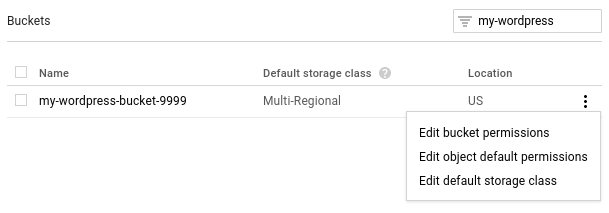
my-wordpress-bucket-999) in Name and click Create. - Click Browser at the top left.
- Find the bucket you just created and click the vertical three dots on the right, then click Edit bucket permissions as shown below:
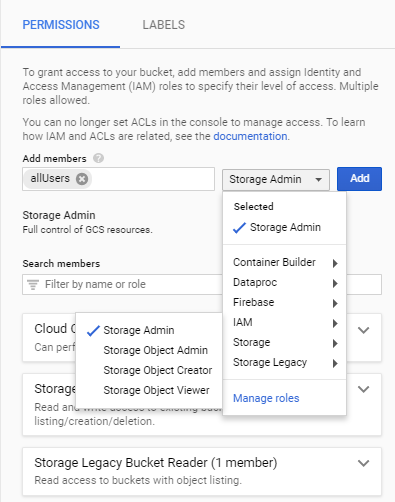
- Type allUsers in the Add members field.
- From the Select a Role dropdown, select Storage > Storage Admin.
- Click Add.
Step 3: Install Composer (cài đặt thư viện composer ai code sẽ hiểu để làm j :v)
Composer is a dependency management tool for PHP, which you'll set up in your Google Cloud Shell environment. It's quite helpful for managing the moving pieces in our App Engine/WordPress deployment.
Run the following commands in Cloud Shell to get Composer installed in your GCP project:
mkdir -p ${HOME}/bin
php -r "copy('https://getcomposer.org/installer', 'composer-setup.php');"
php -r "if (hash_file('SHA384', 'composer-setup.php') === rtrim(file_get_contents('https://composer.github.io/installer.sig'))) { echo 'Installer verified'; } else { echo 'Installer corrupt'; unlink('composer-setup.php'); } echo PHP_EOL;"
php composer-setup.php --filename=composer --install-dir=${HOME}/bin
export PATH=${HOME}/bin:${PATH}
For information about Composer, enter the following command:
composer
Output:
   ______
  / ____/___  ____ ___  ____  ____  ________  _____
 / /   / __ \/ __ `__ \/ __ \/ __ \/ ___/ _ \/ ___/
/ /___/ /_/ / / / / / / /_/ / /_/ (__  )  __/ /
\____/\____/_/ /_/ /_/ .___/\____/____/\___/_/
                    /_/
Composer version 1.2.0 2016-07-19 01:28:52

...
...
If this step doesn''t work, visit the Composer Download page in a new browser window and follow the instructions there. Now, let''s download the skeleton code for our WordPress site.
Step 4: Create your WordPress Project
Get the WordPress helper script
In Cloud Shell, run the following command to clone the Github repository:
git clone https://github.com/GoogleCloudPlatform/php-docs-samples.git
Run the following command to go into the directory where we'll instantiate WordPress:
cd php-docs-samples/appengine/flexible/wordpress
Update and install dependencies with following commands:
sudo apt-get update -y
sudo apt-get install php7.2-zip
composer install --no-dev
Create your WordPress project (sử dụng file YAML để build)
Now, let's create our wordpress project. We'll do this all in the command line by running the
wordpress.php script:php wordpress.php setup- Use the default directory. When prompted
We will use the directory: my-wordpress-project. If the directory exists, we will overwrite the contents. Do you want to continue? (Y/n)Enter Y. - When prompted
Please select the region of your Cloud SQL instance (defaults to us-central1), enterus-central1. - When prompted to enter your
project_id, enter your Qwiklabs project ID found in the connection details section. - When prompted for your password, enter your DB password (should be
password). cdinto the directorymy-wordpress-projectso you'll be ready to run the next step.
Step 5: Deploy and configure your WordPress blog
Deploy your WordPress blog (sử dụng commandline nhé)
To deploy your WordPress project, run the following command:
gcloud app deploy
If you are prompted to choose a region, chose us-central. This command will take several minutes.
Then, run the following command so you can visit your WordPress site:
gcloud app browse
Click Check my progress below to check your lab progress.
After it succeeds, visit your blog by opening
https://YOUR-PROJECT-ID.appspot.com/ You'll see the WordPress installation screen: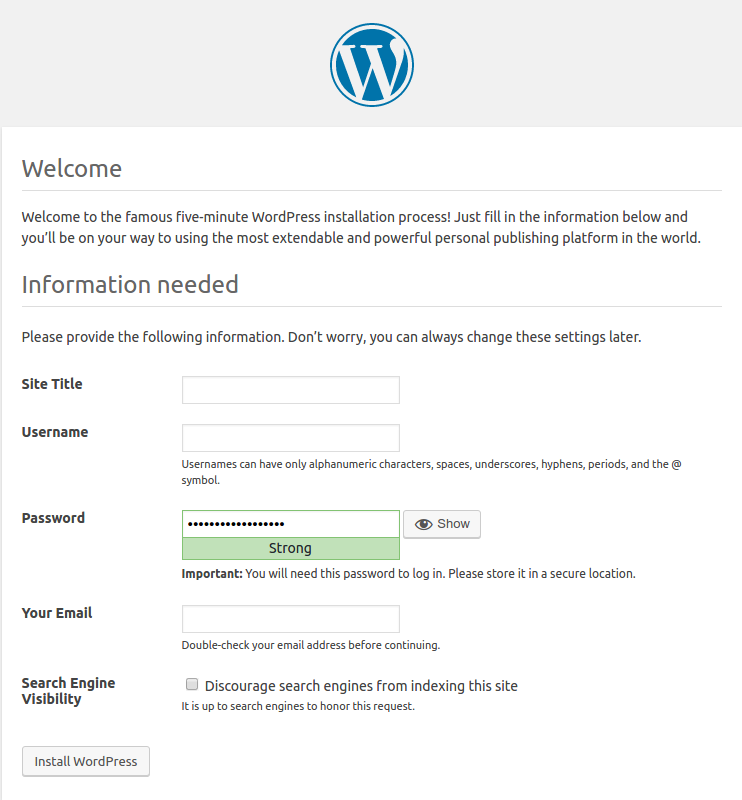
Fill in the following fields:
- Site Title
- Username
- Password
- Your Email
Then click Install WordPress. Your WordPress blog will be ready in seconds!
Configure your WordPress blog (cấu hình kết nối với bucket đã tạo ở trên)
- Click Plugins
- Under Google Cloud Storage plugin, click Activate
- Under Google Cloud Storage plugin, click Settings
- Type the name of your Cloud Storage bucket into Bucket name for media upload
- Click Save Settings
This plugin allows you to upload media files to the Cloud Storage bucket and serve them from there, instead of using the local file system. Because App Engine can spawn a new server for you, the media files must be shared between all the servers.
Upload media files (optional)
Feel free to play around with the WordPress Admin UI, especially the Media uploader which is configured to upload the images to your Cloud Storage bucket. You can browse your Cloud Storage bucket on the Cloud Storage Browser.
0 Nhận xét